How to Run PHP Files on Localhost?
This is my first post on my AllPHPTricks blog so I would like to start with the beginning so even if you are not aware how to run PHP on your local machine you can do it just following this tutorial, let me introduce first XAMPP.
What is XAMPP?
XAMPP stands for Cross-Platform (X), Apache (A), MySQL (M), PHP (P) and Perl (P). XAMPP is very simple and lightweight Apache distribution, i prefer to use it because you can install it any platform Windows, Linux or Mac.
XAMPP has four main components:
1. Apache
2. MySQL
3. PHP
4. Perl
1. Apache
Apache is a web server that processes PHP files and convert them into simple HTML and send it to the web browser of a user. Apache is the most famous web server today, more than 50% websites using it.
2. MySQL
Almost all the websites that are dynamic needs to store data for that purpose we uses a database. MySQL is an open source and the world’s most famous database management system.
3. PHP:
PHP is a server-side scripting language that is used by the most popular websites such as WordPress and Facebook. PHP executes only Apache web server so you can not run it on your local machine without setting up Apache server on your local machine, you can install Apache server and PHP individually but i prefer to use XAMPP. It is open source and easy to learn, you can find thousands of resources to learn PHP free online, it works great with MySQL. Most popular CMS WordPress also uses PHP and MySQL.
4. Perl:
Perl is a high-level, dynamic programming language, mainly used in network programming, system admin, and etc.
How to Install XAMPP?
I am assuming that you are using Windows system, this tutorial will follow the installing of XAMPP for Windows users, although MAC also follow the same procedure.
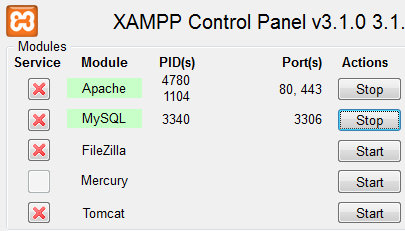
Click here to download the latest version of XAMPP or you can also download it from here www.apachefriends.org after download it, simple install it and select default option to install and click ‘Next Button’, you will also need to choose the directory to install it, I prefer to not install in the drive where you installed Windows, keep it any other directory, in my case i installed it in F:/xampp, when the installation is complete, now open XAMPP and start Apache and MySQL by clicking on Start Button, see the below image. I have clicked on them therefore it is showing now stop and Apache and MySQL is green which means, they are now started.
Now you have successfully installed XAMPP, lets test it. Open a notepad and paste the below code and save it with name testfile.php in the directory F:\xampp\htdocs\
<?php
echo "My First PHP Script";
?>
Now open browser and paste this URL localhost/testfile.php and hit enter, you should see My First PHP Script message on your browser.
Congratulations! you have successfully installed XAMPP and created your first PHP Script, now you can start learning more about PHP and test it on your local machine.
Conclusion
In this tutorial, we learnt how to install XAMPP and and run PHP on your local machine to test your PHP application. This tutorial didn’t cover all areas of XAMPP and PHP but what we learn is the basic only which is required to know every one who wants to choose his/her career in web development.
So what do you think guys? Do you find this tutorial helpful? Let me know about it in the comment section, you can also ask if you are having any kind of problem in the installation process.
Facebook Official Page: All PHP Tricks
Twitter Official Page: All PHP Tricks

it was saying no internet connection, and my connection was on. it also said 404 not found
Thank you very much for this excellent code !
J.A. den Ouden (78 years old and living in the Netherlands)
Thanks for the appreciation.
many thanks for the examples
You welcome Dave.
after instaling xxamp im getting error xxamp server is not work what can i do for taht?
Error is:- appi-ms-win-crt-runtime-|1-1-0.dill
I would suggest you to use Windows 10, because if you are using Win 7 so, this issue arises.
it was super helpful. thanks so much
I like this site .keep it up
This is very nice and simple tutorial for newbie web developer 🙂
Thanks Ahsan 🙂